We divide Secrets management in two parts. First we setup on local machine for development than we discuss to manage secrets for production environment using Azure Key Vault.
Safe storage of app secrets in development in ASP.NET Core
Secret Manager
The Secret Manager tool stores sensitive data during the development of an ASP.NET Core project. In this context, a piece of sensitive data is an app secret. App secrets are stored in a separate location from the project tree. The app secrets are associated with a specific project or shared across several projects. The app secrets aren’t checked into source control.
How the Secret Manager tool works
The Secret Manager tool hides implementation details, such as where and how the values are stored. You can use the tool without knowing these implementation details. The values are stored in a JSON file in the local machine’s user profile folder:
You can find your secret file below folder.
“C:\Users\UserName\AppData\Roaming\Microsoft\UserSecrets”
Create Asp.net Core Api Project in Visual studio 2022
1- To use the secrets in your ASP.NET Core API, you’ll need to add the Microsoft.Extensions.Configuration.UserSecrets package to your project. You can do this using the following command:
dotnet add package Microsoft.Extensions.Configuration.UserSecrets
2- First, you’ll need to create a secrets file. To do this, open a command prompt or terminal and navigate to the root directory of your project. Then, run the following command:
dotnet user-secrets init
3- Run below command to set the connection string
dotnet user-secrets set "connectionstring" "Server=(localdb)\\\\mssqllocaldb;Database=EFGetStarted.ConsoleApp.NewDb;Trusted_Connection=True;"
4- Create a controller to test the secrets and paste below code.
using Microsoft.AspNetCore.Http;
using Microsoft.AspNetCore.Mvc;

namespace AzureKeyVault.Controllers
{
    [Route("api/[controller]")]
    [ApiController]
    public class LocalSecretsController : ControllerBase
    {
        private readonly IConfiguration _config;
        public LocalSecretsController(IConfiguration config)
        {
            _config = config;
        }
        [HttpGet]
        public IActionResult Get()
        {
            var connectionString = _config["ConnectionString"];
            return Ok(new { connectionString });
        }
    }
}
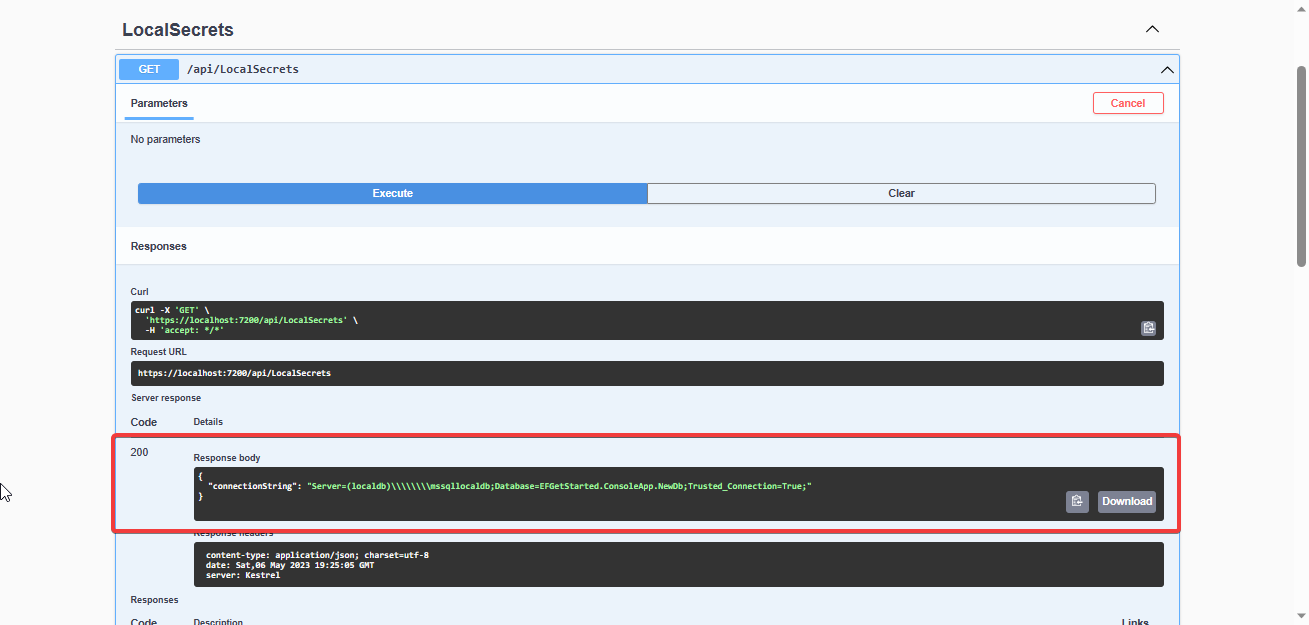
4- Run Project and go to Swagger/index.html.

You now get the idea how we can manage our secret on local machine for development .
Managing Secrets Securely in the Azure Cloud with Azure Vault Key Service
Managing secrets in cloud solutions can be a big challenge. Azure Key Vault provides a secure storage for secrets and keys, and allows access control and management of these secrets through policies.
Azure Key Vault is a cloud-based service offered by Microsoft Azure that helps to safeguard cryptographic keys and secrets used by cloud applications and services. It provides a secure key management solution that enables users to store and manage cryptographic keys, certificates, and other secrets such as passwords and connection strings.
Create Web App Service
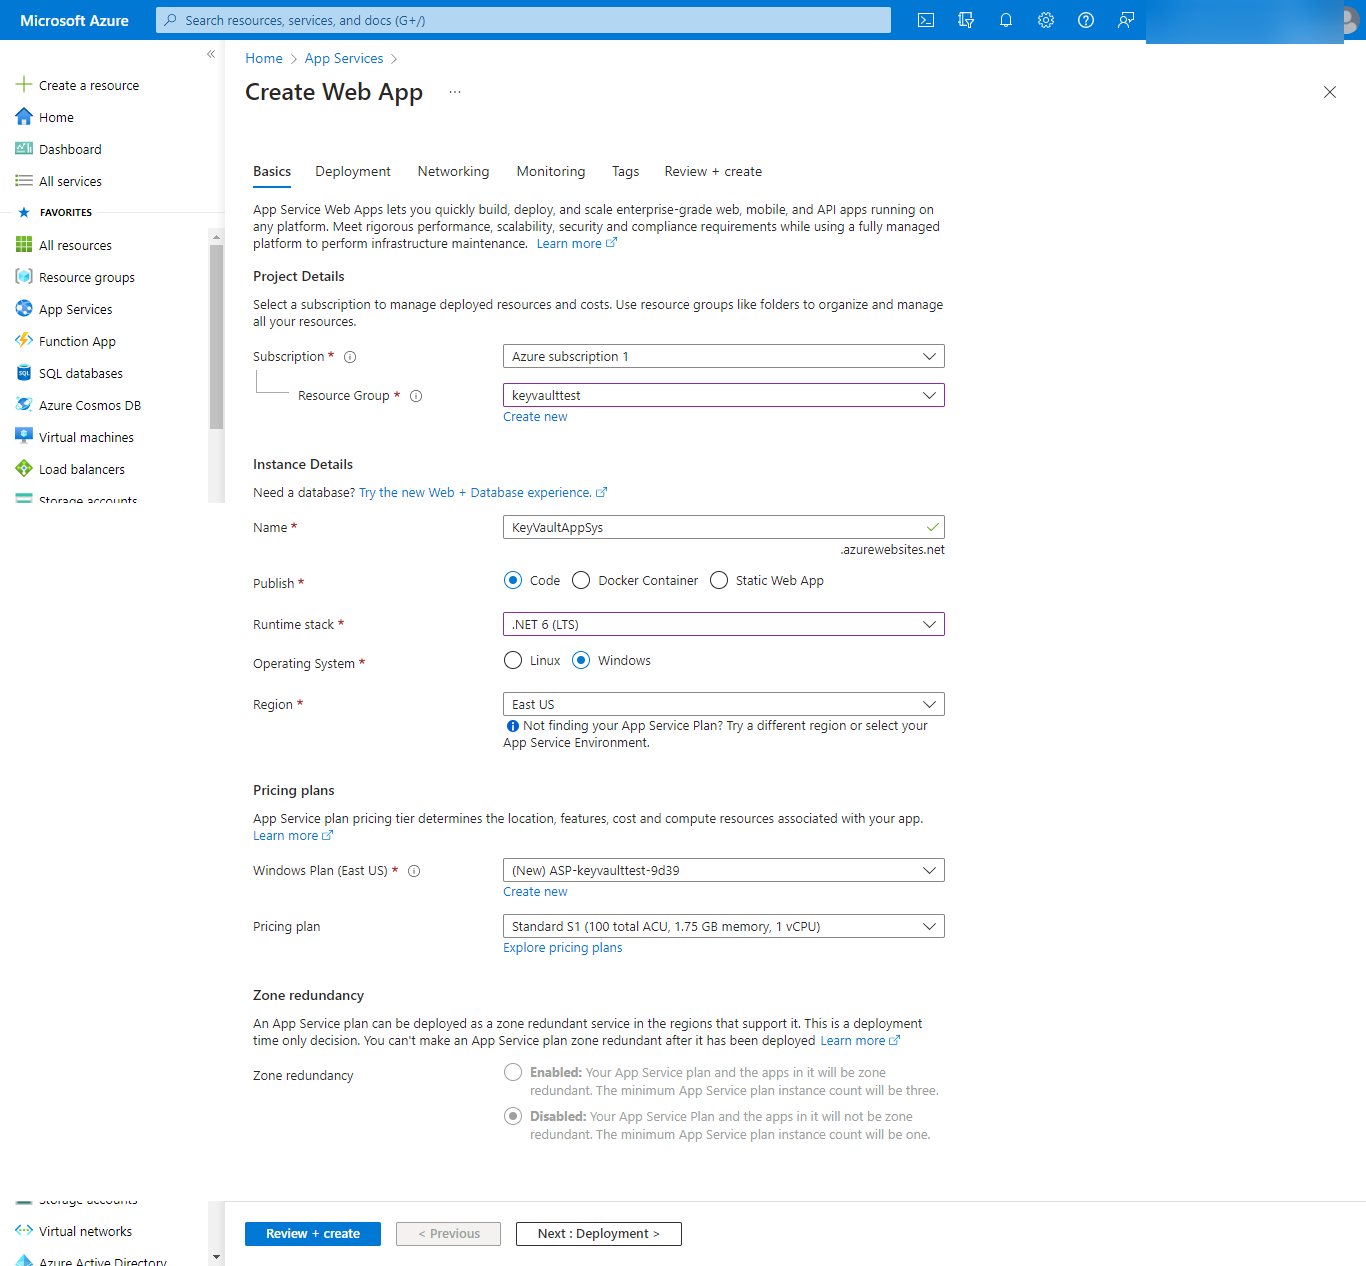
1- Create Azure Web App Service in Azure Portal

2- After Successfully creation of App service go to resource.
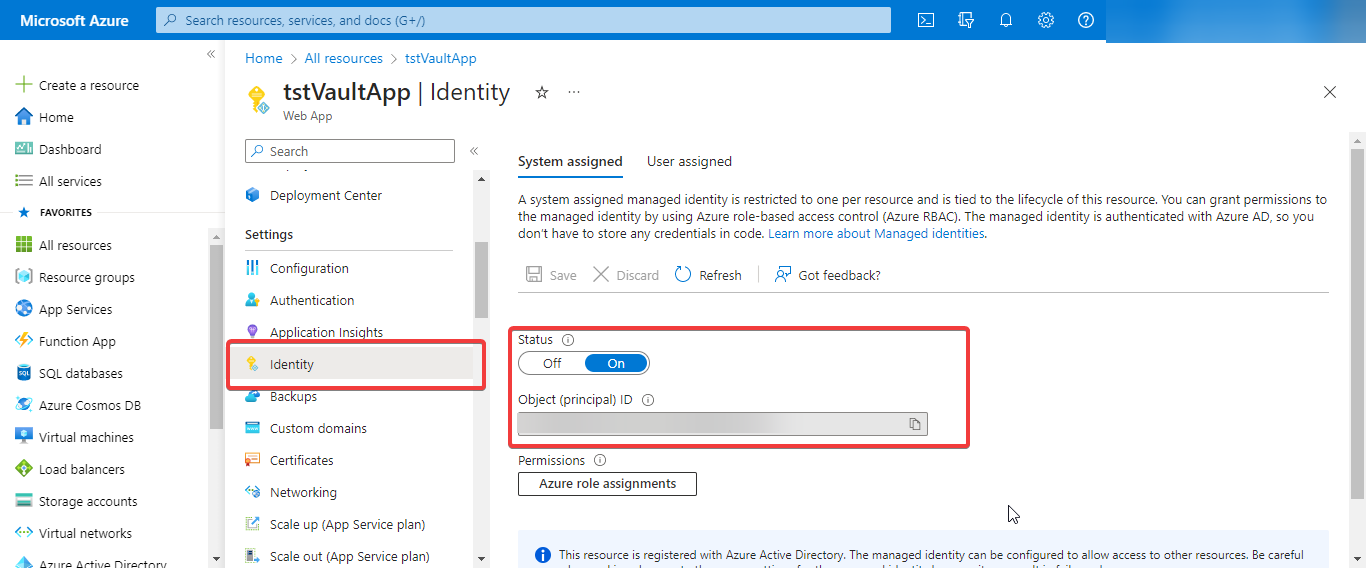
3- Go to Identity from side menu of resource.

4- Change the status to on and copy the object id.
5- Search Key Vault from portal and create Azure key vault. 
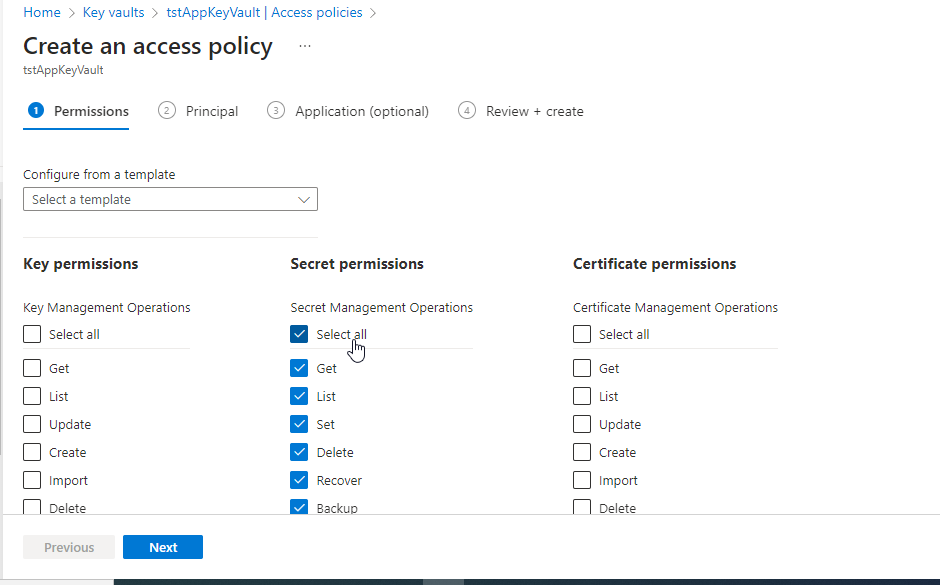
6- After Successfully create select “Access Policy” from side menu.
7- Click on create button to create access policy.

8- Next step paste the object id that we copy from at step no 3.
9- At end create the access policy.
10- Now we create secret by click on secret tab from side menu.
11- Create a secret with ConnectionString Name and set value.
12- Go to Visual stuio 2022.
13- Install the below package.
dotnet add package Microsoft.Extensions.Azure --version 1.6.3
dotnet add package Azure.Security.KeyVault.Secrets --version 4.5.0
14- Create a Controller and paste below code.
using Azure;
using Azure.Security.KeyVault.Secrets;
using Microsoft.AspNetCore.DataProtection;
using Microsoft.AspNetCore.Http;
using Microsoft.AspNetCore.Mvc;
using Microsoft.Extensions.DependencyInjection;

namespace AzureKeyVault.Controllers
{
    [Route("api/[controller]")]
    [ApiController]
    public class SecretManagementController : ControllerBase
    {
        private readonly SecretManager _secretManager;


        public SecretManagementController(SecretManager secretManager)
        {
            _secretManager = secretManager;
        }

        [HttpGet, Route("GetAzureVault")]
        public async Task<IActionResult> GetAsync([FromQuery] string secretName)
        {
            if (string.IsNullOrEmpty(secretName))
            {
                return BadRequest();
            }

            string secretValue = await _secretManager.GetSecretAsync(secretName);

            if (!string.IsNullOrEmpty(secretValue))
            {
                return Ok(secretValue);
            }

            else
            {
                return Ok("There is no secret stored in the Key Vault");
            }
        }
    }

}
15- Create a Class with SecretManager name and paste below code.
using Azure;
using Azure.Security.KeyVault.Secrets;

namespace AzureKeyVault
{
    public class SecretManager
    {

        private readonly SecretClient _secretClient;
        private readonly IConfiguration _configuration;

        public SecretManager(SecretClient secretClient,
                             IConfiguration configuration)
        {
            _secretClient = secretClient;
            _configuration = configuration;
        }

        public async Task<string> GetSecretAsync(string secretName)
        {
            string secretValue = string.Empty;
#if DEBUG
            secretValue = _configuration[secretName];
#else
            try
            {
                KeyVaultSecret secret = await _secretClient.GetSecretAsync(secretName);
                secretValue = secret.Value;
            }
            catch (RequestFailedException ex)
            {
                if (ex.Status == 404)
                {
                    return secretValue;
                }
                else
                {
                    throw;
                }
            }
#endif
            return secretValue;
        }

    }
}
16- Go to appsetting.json file and paste below code.
"KeyVault": {
  "VaultUri": "https://tstappkeyvault.vault.azure.net/"
}
17- Go to Program.cs and paste below code.
var keyVaultEndpoint = builder.Configuration["KeyVault:VaultUri"];
var credential = new DefaultAzureCredential();
var client = new SecretClient(new Uri(keyVaultEndpoint), credential);

builder.Services.AddSingleton(client);

builder.Services.AddSingleton<SecretManager>();
18- Also comment if condition to see swagger when app publish on azure.
// Configure the HTTP request pipeline.
//if (app.Environment.IsDevelopment())
//{
    app.UseSwagger();
    app.UseSwaggerUI();
//}
19- Right click on project and select publish and publish app to azure web service.
20- After Successfully Publish got to url of app and append /Swagger/index.html.
21- Select Api and paste your secret name you see the secret value in response.

Thanks for reading if you any question please feel free to contact on LinkedIn or drop an message on contact us page.
