Azure Functions is a serverless solution that allows you to write less code, maintain less infrastructure, and save on costs. Instead of worrying about deploying and maintaining servers, the cloud infrastructure provides all the up-to-date resources needed to keep your applications running.
Benefits of Azure Functions:
- Serverless Architecture: With Azure Functions, you don’t need to worry about server management, scaling, or provisioning. The service automatically handles the infrastructure for you, ensuring that your code runs reliably and efficiently.
- Event-Driven Execution: Azure Functions are designed to respond to various events or triggers, such as HTTP requests, timers, messages from queues, changes in data within Azure Cosmos DB or Azure Storage, and more. This makes it ideal for building event-driven applications and microservices.
- Cost-Efficient: You’re only billed for the compute resources used during the execution of your functions. Since the service automatically scales based on demand, you avoid paying for idle resources.
- Scalability: Azure Functions can scale automatically to handle high demand. When an event or trigger occurs, the platform dynamically provisions the necessary resources to execute the function efficiently. This ensures your application can handle varying workloads without manual intervention.
- Integration: Azure Functions can be easily integrated with other Azure services and external services, enabling you to build comprehensive solutions. You can use bindings to interact with various services and data sources without writing extensive integration code.
- Supported Languages: Azure Functions supports multiple programming languages, allowing developers to choose the language they are most comfortable with. This flexibility ensures that teams can leverage existing skills and knowledge.
- Developer-Friendly: Developing Azure Functions is relatively straightforward, and you can focus on writing the code that responds to events without dealing with the complexities of infrastructure management.
- Stateless Execution: Azure Functions are designed to be stateless, which promotes the development of modular, easily testable, and scalable code. Any required state can be stored externally, such as in Azure Storage or databases.
Azure Function in Visual Studio 2022 that uploads an image to Azure Blob Storage.
Step 1: Open Visual Studio 2022 click on “Create a new project” and search for “Azure Functions” in the search box and select the “Azure Functions” template and choose the appropriate project settings, including the project name, location, and solution name.
Step 2: Visual Studio create a simple template with Function1 Name.
Step 3: Rename the Function1 with UploadImageFunction.
Step 4: Create Azure Blob Storage for image store.
Step 5: Please click this link to create blob storage in azure.(https://itsusamaarshad.com/azure-blob-storage-with-net-6-web-api/)
Step 6: Paste below code.
using System;
using System.IO;
using System.Threading.Tasks;
using Microsoft.AspNetCore.Mvc;
using Microsoft.Azure.WebJobs;
using Microsoft.Azure.WebJobs.Extensions.Http;
using Microsoft.AspNetCore.Http;
using Microsoft.Extensions.Logging;
using Newtonsoft.Json;
using Microsoft.WindowsAzure.Storage.Blob;
using Microsoft.WindowsAzure.Storage;

namespace ImageUploadFunction
{
    public static class UploadImage
    {
        [FunctionName("UploadImage")]
        public static async Task<IActionResult> Run(
            [HttpTrigger(AuthorizationLevel.Anonymous, "post", Route = "upload")] HttpRequest req,
            ILogger log)
        {
            log.LogInformation("C# HTTP trigger function processed a request.");
            #region upload
            try
            {
                // Retrieve the image file from the request
                var file = req.Form.Files[0];

                // Connect to Azure Blob Storage
                string storageConnectionString = "Replace Your Blob Connection String";
                CloudStorageAccount storageAccount = CloudStorageAccount.Parse(storageConnectionString);
                CloudBlobClient blobClient = storageAccount.CreateCloudBlobClient();
                CloudBlobContainer container = blobClient.GetContainerReference("imageupload");

                // Generate a unique filename
                string fileName = Guid.NewGuid().ToString() + Path.GetExtension(file.FileName);
                CloudBlockBlob blockBlob = container.GetBlockBlobReference(fileName);

                // Upload the image to Blob Storage
                using (var stream = file.OpenReadStream())
                {
                    await blockBlob.UploadFromStreamAsync(stream);
                }

                return new OkObjectResult($"Image uploaded successfully. Blob URL: {blockBlob.Uri}");
            }
            catch (Exception ex)
            {
                log.LogError(ex, "An error occurred");
                return new StatusCodeResult(500);
            }
            #endregion
        }
    }
}
Step 7: Replace "Replace Your Blob Connection String" with your actual Azure Storage connection string.
Step 8: Build the project. Right-click the project in Solution Explorer and select “Publish”.Choose your desired publishing method and configure the necessary settings to deploy the function to Azure.
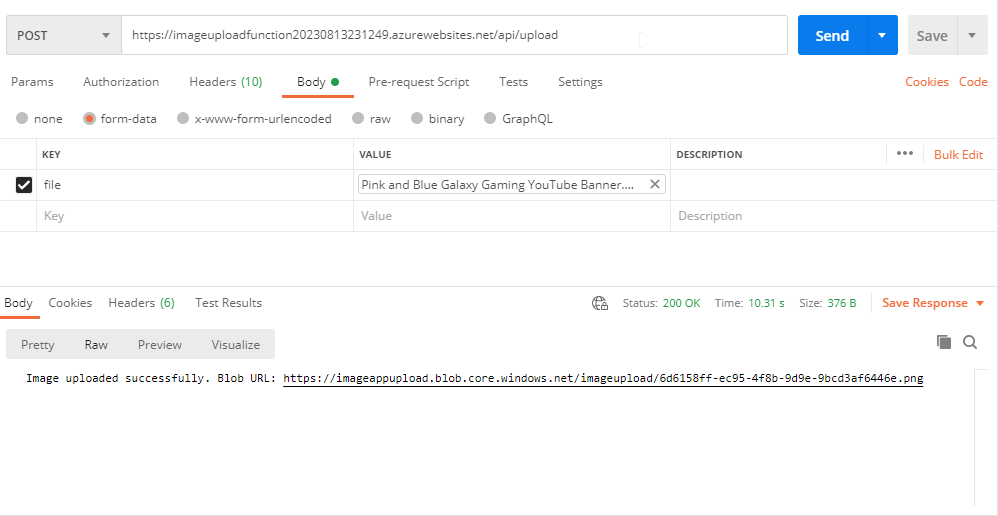
Step 9: Copy the Url and test in Postman.